Thursday, December 18, 2014

Homeschool: How We Keep Our Lessons/Work Organized

I spent most of the morning working on lesson plans for our next grading period.  In January, we will be starting our 4th grading period for our homeschool year.  We started late July and will end late May. We work for six weeks (one grading period) then take a week off.  We follow that rotation six times which equals 180 school days for the year.  The week off every six weeks is very much needed (especially for my sanity).  :)  Our holiday breaks this year are one week at Thanksgiving, 3 weeks for Christmas, and the week after Easter.  With the frequent breaks we do have to start earlier in the year (July) but the breaks are so beneficial.  I really like this schedule and plan to follow something similar next year.  Also, it just so happened that our week breaks landed on the kids' birthdays.  So, each kiddo is off the week of their birthday - Happy Birthday!!! **Bonus - my birthday is the day after my daughter's so the teacher is also off the week of her birthday! I love reading various blogs and talking to other homeschool moms about how they organize their lessons.  I would consider my form or organizing very traditional and structured.  Our family seems to work best with lots of structure. I begin with my lesson plan book and plan for the entire grading period all at one time.  There are times when I have to change lessons or take a little longer if a concept is not being picked up by my child.  However, for the most part we stick to the lesson plan book.  I tend to be a bit type A (yes, I admit it) and staying on schedule makes me relax - as much as a type A person can relax.  :)  Which is probably still pretty uptight compared to most people.
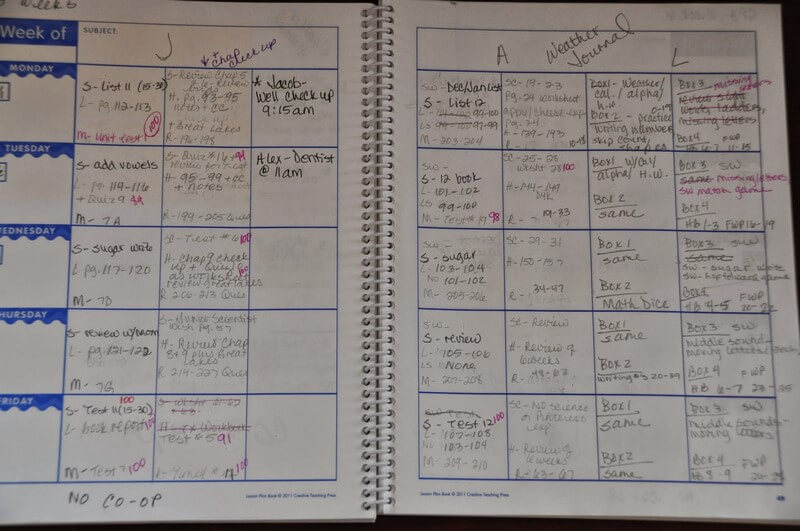
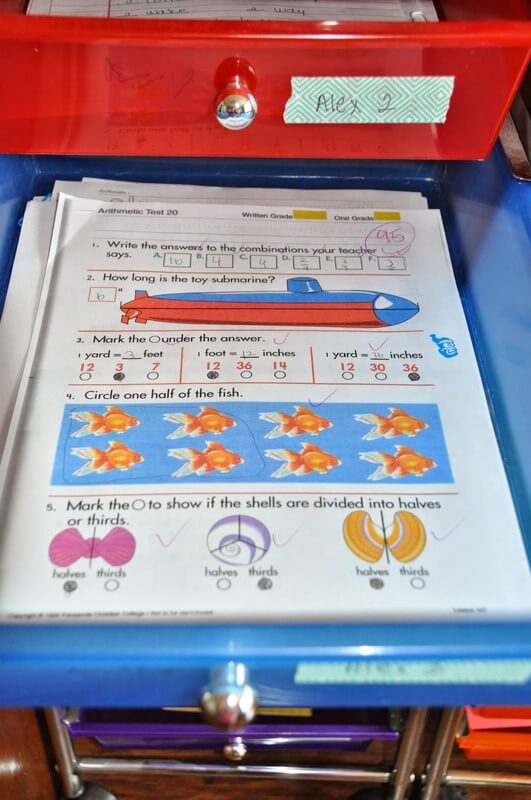
This is "the book".  Usually, Friday's are reserved for CO-OP.  We are part of an amazing Christian CO-OP and we LOVE our Friday's.  I do not teach in our home classroom on Friday's unless (like this picture) it is not a CO-OP week.

Each child has two columns.  On the third column of the first page, I write down appointments or extra curricular activities. This way, I am not having to run and get my personal calendar when we are already upstairs in the classroom.  This image is hard to see, but the small markings in red or hot pink are grades that go into the grade book (Excel spreadsheet) for report cards at the end of the grading period.  Many homeschooling families do not keep grades or report cards - and that is perfectly fine.  However, for my family, remember we need structure.  The grades are my way of keeping track of progress and mastery.  Also, my kids take their grades very seriously and I want to keep it that way.  If a 100 is not made on a test, worksheet, quiz, etc. then we take the time to go back and work on that assignment until the concept is mastered.  This is such a glorious part of homeschooling - it is completely geared toward the individual child.  If he or she needs more time - great!  If they are cruising along we do not stop to wait - we move to the next assignment.  I love this part of homeschooling!

From the lesson plan book, we move to Assignment Sheets.  I have done these sheets a couple of different ways.  I have run around like a chicken with its head cut off telling each child what each and every assignment should be.  That led to the kids waiting around on me while I was working with another child.  It drove me crazy and felt like we were wasting time.  I have written the assignments down on notebook paper and spiral notebooks.  That system worked fine and I would use it again.  Currently, we are using the assignment sheet you see below.  I use "the bucket" or workbox system (will discuss more in a minute) so the sheet corresponds to the buckets and days of the week.  I can print a blank sheet for each child for each week and fill in their assignments.  For the boys, this keeps them on track and organized.  Also, if I am working with their sister, they can move on to the next subject and assignment without having to wait on me.  The sheet is placed on their desk at the beginning of the week to be used Monday through Friday.

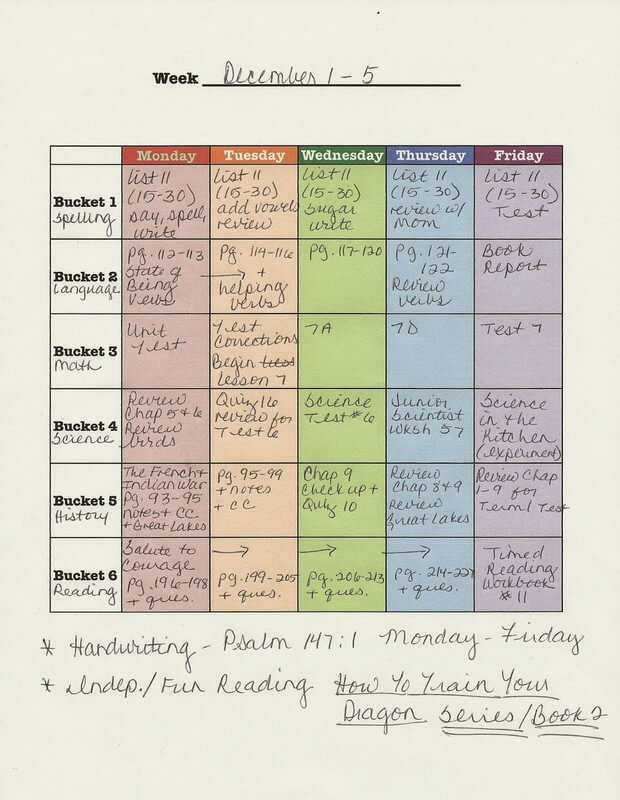
I have a blank version of this sheet at the end of this post for anyone who would like to print and use it.


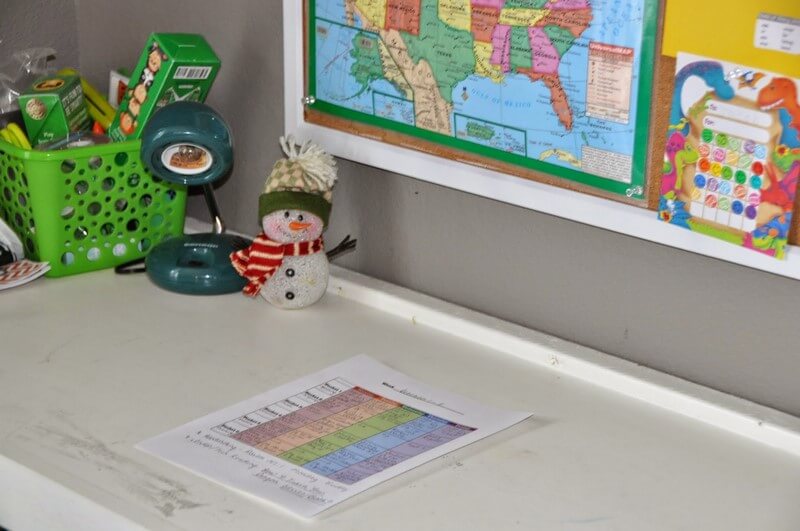
Here is a picture of the sheet on my oldest son's desk.  I used his desk for the picture because it is ALWAYS clean and organized.  The other two kiddos...well, their desks are more...artistic. :)

Workboxes, work stations, buckets, whatever you want to call them - they are the nuts and bolts of our classroom.  I wish I could take credit for this idea but it is used by many homeschooling families and it works really well.  We call ours workboxes, "buckets".  I have no idea why, that is just what stuck with my kids.  Both boys (4th and 1st grade) have six buckets each.  My daughter (Pre-K) has four buckets and I have 3 buckets for stickers, my own office supplies, etc..  We also have an extra bucket with small prizes, which we call the prize drawer.  Why the strange division of buckets?  Because when we purchased the towers we only had 20 buckets.  I didn't want to spend the money on a third tower so I just made it work.  Next, year a third tower will be purchased, my daughter will have six buckets and I will have more drawers for supplies and such.


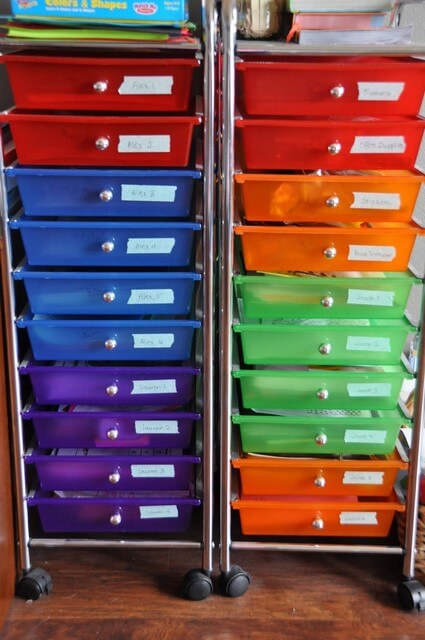
Each bucket is assigned the child's name and a number (1, 2, 3 and so on), which I placed on the front of the bucket with washi tape.  At the beginning of the year, the kids decided which subject they wanted in each bucket.  We moved some buckets around after the first grading period to their liking.  It is easier for me to say,"Get out your first bucket or second bucket," then to remember which child is doing which subject.  Also, there are times when we have to jump around.  If one child is staying on math a little longer than normal and needing my complete attention, then I will tell the other kids to move to a bucket they can complete on their own.

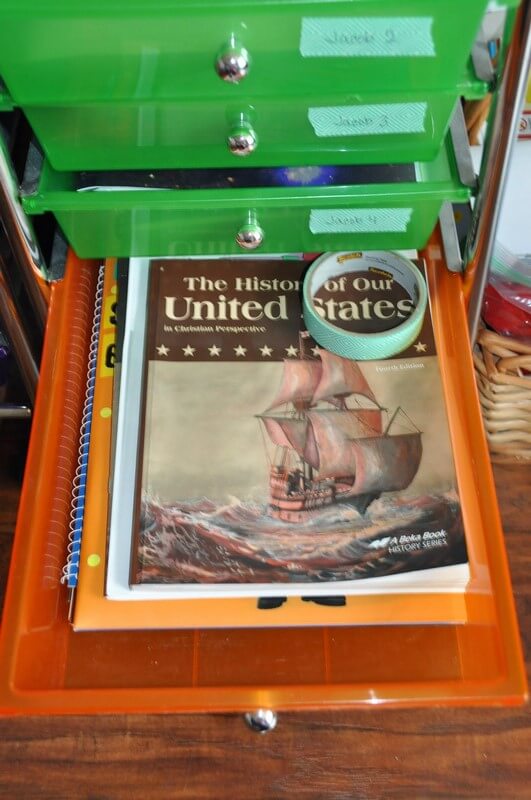
My oldest son's history bucket

Remember, that each subject, bucket, and assignment sheet correspond with one another.  Each bucket is filled with any worksheet, office or craft supply, notebooks, etc. that will be needed for the entire week.  This leaves zero room for one of my kids to say, "What am I suppose to be doing?"  I reload buckets on Friday afternoons.  After my kids have completed a bucket they place them at the end of the classroom under our window.  They like the feeling of looking at the tower become empty as the buckets are removed.  I think it makes them feel like they are really accomplishing something.

My youngest son's math bucket

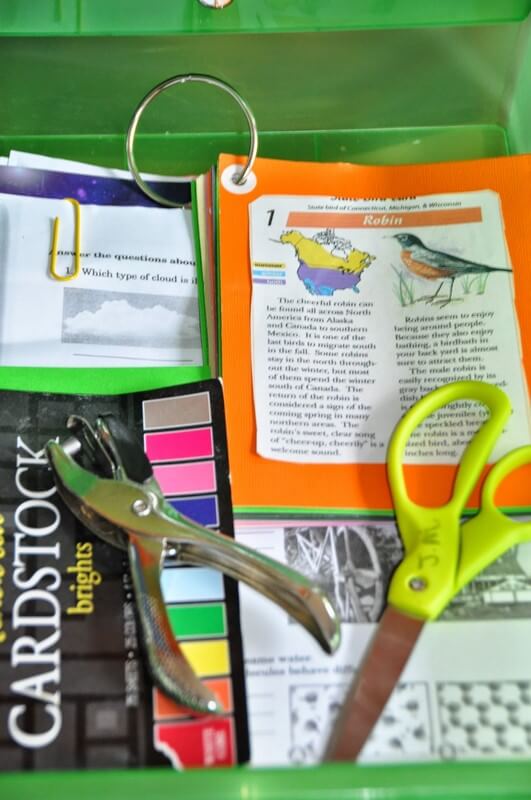
My oldest son's science bucket - his absolute favorite!

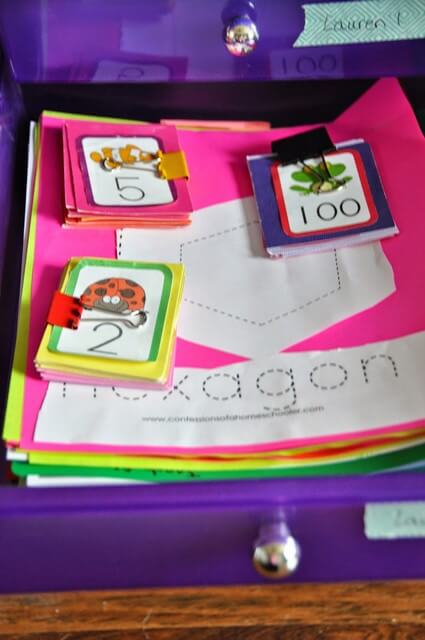
My daughter's math bucket with her shape notebook and skip counting cards.  I purchased her curriculum from Confessions of a Homeschooler and I cannot say enough good things about it.  It is absolutely wonderful!

After, each child has completed an assignment, it gets turned into their grading folder.  I try to grade as things are turned in or at least at the end of the day.  If something is missed on an assignment I call them over to my desk and we take the time to go over the mistake.  
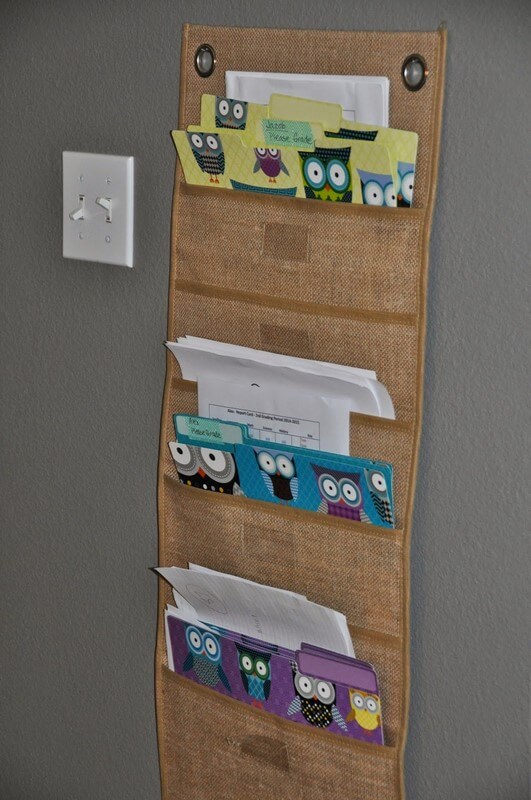
Grading folders

Once everything checks out okay, the grade goes in red or pink ink in my lesson plan book (later to be put into Excel for report cards) and then back into the specific subject bucket.  Graded assignments are always placed on top in the buckets.  When the kids pull the bucket out the next day they know to put away the graded assignment before starting that day's assignment.  Each of the kids have their own way of organizing their graded work.  My oldest prefers a separate folder for each subject.  My youngest son likes to keep all of his graded work in one binder divided by subjects.  This keeps all of those loose papers (so, so many papers) put away.

So, are ya still with me?! :)  Did you dose off?  This was definitely a doozie of a post.  I just love discussing this type of stuff with other moms.  I know I am a nerd! :)

If you would like a blank copy of our Assignment Sheet, here it is.  

* After clicking (click here to print), you will be sent to a Google Doc page.  From there select "file", then select "download".  The image will download to your computer and then you can print from there.


Okay, so if you made it to the end of this crazy long post, I LOVE YOU! :)


Tuesday, December 16, 2014

Christmas Card Outtakes

I love, love, love Christmas cards.  I look forward to checking the mailbox throughout December for hopes of new Christmas cards.  Over the years, we have had some pretty funny photo shoots.  I prefer to have the pictures taken at home.  It saves a ton of money and I don't really have to do too much planning in advance.  

Earlier this year, my husband and I tackled a huge project in our bedroom.  We like to refer to as "The Wall".  We spent several days planking and distressing one of the walls in our master bedroom.  Since this was such a huge project and our bedroom has great daytime light, it was the perfect place for an at-home photo shoot.  We moved our bed to the other side of the room so we would have a large empty space for the pictures.  I put the camera on the tripod, asked the kids to throw on something Christmas-y (meaning jeans without holes and a shirt with a collar).  :)  I had made some photo booth props the day before and that was all the preparation I did.  We also added the cheese factor by playing Christmas music in the background.

We had a really great time and took 75 pictures!  Here are some of the outtakes.

Daddy has such a way of keeping everyone calm... :)

yep... this was a calm and reserved photoshoot...

I just love the look on her face.

Oh my...

Charlie's face cracks me up in this picture.

We are not sure what she was doing, but she insisted on this pose.  At least her toes are pointed!

Charlie is looking very innocent in this picture.

By Charlie's request, this picture made it onto the back of this year's card.  

This was so funny.  We arranged the kids and then there was just enough room for me to run in and wedge myself between Charlie and our oldest son while trying to beat the 10 second timer on the camera.

And then I had to do it again...

At this point, the attention spans were gone, especially with the biggest child in this picture.  Guess whose idea this was?

Melts my heart.

Beginning to go downhill

The picture shows a common look on my face.  It is the look when I lose complete control of my kids.

I've given up at this point.

My favorite!


Wednesday, December 10, 2014

Teacher Gifts: I Love This Idea!!!

Since we homeschool, teacher gifts are not something we have to worry about BUT for most parents teacher gifts can become a tad stressful.  There are always the questions of what will the teacher like, how much money is appropriate, would he or she just rather have a gift card, what is everyone going to bring?  

My cousin, Jessica, writes on her blog called, The Almost Perfectionist.  I just love, love, love her blog and I check in for new posts all the time.  Yesterday, she posted about the teacher gifts she put together this year.  First when I opened my email this morning, I was super excited to see that she had a new post.  But when I read the post my jaw dropped, I thought her gift idea was genius!  It is not only a great idea for teachers but girlfriends, mothers, mother-in-laws, Bible study women, pretty much any female that I could think of.

She put together individual baskets filled with Christmas wrapping supplies.  They are the cutest, holiday wrapping stations - everything you would need in one little package.  I just love the idea!  

Please head over to her blog and take a look.  It may just help you check one, two, or three more people off your list!


This picture is just a peek of what she put in the baskets.  You can see all of the pictures and contents at her blog.

Happy shopping, wrapping, and giving!!!


Thursday, December 4, 2014

Stitch Fix - Shipment 2

Well with much anticipation, my second Stitch Fix shipment arrived.  I ran upstairs with the box and scissors in hand, cut it open quickly, and rummaged through the new items.  My daughter was right behind me, as she has quickly caught to the excitement.

My first impression was not great but I thought maybe everything would look better on.  I put each piece on and then stood in front of my daughter so she could give her opinion.  Yes, I know she is only 4 but she has a huge opinion when it comes to my clothes! :)  

I tried my hardest to like the items but this box was a complete flop.  Most of the pieces I didn't like at all and the one I had high hopes for didn't fit.  Ugh!  I hated the idea of having to send everything back and losing my $20 styling fee, but I guess that is the gamble with Stitch Fix. 

I shipped everything back a couple of days ago, but in case you are curious I will give you a peek. 

1.  Color block sweater - I cannot and have never been able to wear light beige against my face.  Even with full make-up, I look completely washed out.  This piece fit well, but it definitely didn't have a feminine feel to it.


2.  Baseball type sleeve sweater - I could have made this work with a cute scarf or big necklace but the fit was horrible.  


3.  Red tunic with keyhole - This item I really liked...until I put it on my body.  It obviously was cut for someone with zero curves.  It looked great until the hips and then it was just plain bad!  


4.  Skinny jeans - need I say more...  I just mentioned that the above tunic did not fit because it was made for someone with out curves.  I didn't even try these on.  I held them up, lean them against me, and then began laughing... or maybe it was crying... or a bit of both.   I have since changed my Stitch Fix profile to, "Please, never send me jeans again!"


5.  Beaded necklace - Ummmm, not my taste and it was $58!!!!


So, there you have it, my Stitch Fix bust.  My next fix arrives in February, should be interesting to say the least.


Tuesday, December 2, 2014

Christmas Cone-ifers

Something I try to do with the kids each holiday season, is some type of countdown to Christmas.  Some years I pre-plan all activities for the month, other years we have added Bible verses, one year we counted down with Hershey's kisses.  Each year the activities and schedules are slightly different but the intention is the same.  As much fun as it is to think about Santa, decorate, have family gatherings, and eat yummy food (all of which we do), our main focus should be the birth of Jesus.  I have to admit though, the years that I pre-plan typically are more stressful (for me).  I end of panicking at 10 o'clock at night because I have realized that I don't have all the supplies for the next day.  At which point, I begin shuffling to steal an activity from a different day.  This causes musical switcher-roo and I become the stressed out crazy Christmas mom.  I have learned it is better to just plan a few days at a time - way less stress. Yesterday, we kicked off the season with our Advent Wreath.  Today, the kids learned about the history of the Christmas tree and made "conifers".  One of the books I use to reference throughout our activities is The ADVENTure of Christmas by Lisa Whelchel.  It is such a great tool for the education behind different activities.  I had never used this book until last year when a friend introduced me to it.  It has become such a great addition to our holiday traditions. Cone-ifers are small edible Christmas trees made from ice cream cones, green icing, and mini M&M's.  YUM! Christmas Tree Tidbit -  Evergreen trees are used as a symbol of God and the shape of the tree represents the Holy Trinity - Father, Son, and Holy Spirit.  


Happy Holidays!


Monday, December 1, 2014

Advent Wreath - A New Tradition for Our Family


I have been wanting to start the tradition of an Advent Wreath with my kids for the last couple of years. Typically, though, I remember around the second week of December and by then it is too late.  This year when it crossed my mind, our family was knee deep in the flu and I couldn't get out to get the items.  We finally made it out today!  Woohoo - this year I am only one day late (we really should have started it last night).
The Advent wreath is a Christian tradition which symbolizes the four weeks of Advent.  The word advent means preparing for the arrival of a noble person.  In Christian tradition, Advent is recognizing the four Sundays leading up to Christmas and the birth of Jesus.  Each Sunday is represented with the lighting of a candle.

A wreath is used to represent God (having no beginning or end).  Evergreens are traditionally used in the wreath to represent life.  Five candles are placed in the center of the wreath (3 purple, one pink, and one white).  

First Sunday:   Purple candle - Symbolizing hope (referred to as the Candle of Hope or Prophecy Candle)

Second Sunday:   Purple candle - Symbolizing the coming of Jesus (referred to as the Bethlehem Candle, Candle of Preparation, or Candle of Peace)

Third Sunday:   Pink candle - Symbolizing the angels singing of joy (referred to as the Shepard Candle or Candle of Joy)

4th Sunday:  Purple candle - Symbolizing the love God gave to the world through Jesus (referred to as the Angel Candle or Candle of Love)

Christmas Day (sometimes lit on Christmas Eve):   White candle - Symbolizing the purity of Jesus Christ (referred to as Christ Candle)
I explained each candle to the kids as we put the wreath together.  I also explained that the Advent Wreath has a long history in European countries (one being Germany which is part of our heritage).  They asked if anyone in our family had ever recognized this tradition.  For some reason, if someone in our family has already done a particular tradition they feel it is that much more important.  :)  To their delight I explained that Great Grandma Esther (my mom's mother) would light an Advent Wreath each year (as my mom was growing up).  That pretty much sealed the deal - they are hooked!  

We also lit the first purple candle to make up for being a day late.  :)  They were so excited to place the wreath next to our Nativity scene.  Throughout the afternoon I have noticed each of them quietly walking over and looking at our new addition.

Merry Christmas!!!


P.S.  If you noticed (and are wondering) why every single piece of our nativity is shoved in the stable the answer is:  "There is a storm coming and we don't want anyone to get wet," said three children with huge imaginations!


Tuesday, November 25, 2014

Thanksgiving Treat: Pumpkin Spice Granola

About a month ago,  I posted the ever so awesome Pumpkin Spice Granola.  It is so good!!!  I have  made it twice since I found the original recipe and I decided to share it with our Thanksgiving guests.  Due to my husband's schedule we never go out of town for Thanksgiving.  It is understood by both sides of our family that the five of us stay home and everyone is welcome to join us.  Since we established this tradition our Thanksgiving has become my favorite holiday.  Typically both sides of the family come over plus friends or pretty much anyone who needs a place to go.  Have I mentioned before that my husband and I love feeding people?  I think I have.. maybe one of twice. :)  We love it - it is our love language! I always try to have a special treat for our family and friends to take home (along with their leftovers).  I have baked homemade bread, made hot chocolate mixes in mason jars, holiday potpourri bags (see here), and this year will add the granola. Here is the original site for the recipe, Pumpkin Spice Granola recipe as originally posted by Joyful Healthy Eats.  The first time I made the granola I stored it in mason jars (see here), however, this time I thought the bags would be cute. I placed the granola into festive bags, then added a label and ribbon.  If you would like to use the label feel free to print below.

Here's to wishing everyone a wonderful Thanksgiving filled with love, family, friends, and FOOD! :)


Monday, November 17, 2014

National Homemade Bread Day!!!

Yes, this is an actual day! Today is National Homemade Bread Day. Now, who wouldn't be excited about that? The kids and I thought it would be a great idea to add it into our lessons for today.  We have been planning this day for a couple of weeks, now.  I guess you could say our family likes bread just a tiny bit... :) I didn't want to lose an entire day of lessons so we completed their school work while the bread rose and baked.  It was lots of fun, but man were we busy! The kids made two types of bread: white flour dinner rolls and banana bread.
Learning about yeast and how it is a living organism which makes the bread rise.  We also discussed that if your water is too cold the yeast won't activate and if the water is too hot you may accidentally kill the yeast.  If you want good bread you have to have happy yeast!

Its going to be a good day when you get to operate the Kitchen Aid.

I spent quite a bit of time teaching each of them how to knead the dough properly.  They took the instructions very seriously and did a great job.


I am not sure what this was about.  There was a lot of singing and jumping up in down in a circle...  Although, I have my own happy dance I may or may not do when fresh bread is in the house.  I guess they come by it naturally.

While the bread was rising, we started on the banana bread.  The kids thought the over-ripe bananas were super gross.  So, naturally they needed a picture with those gross bananas.


This picture cracks me up!

Y'all she will be five in four months...How is this possible?

Sampling the second the rolls were cool enough to handle.

Everyone insisted they have a picture taken with the roll in their mouth.  Too funny.


We had tons of fun and did sooooo much math.  I purposely used smaller measuring cups and spoons so they would have to multiply to get the correct measurements.  Also, there are three children so I incorporated division in taking turns.  We needed to make sure everyone had the same amount of certain ingredients (i.e. flour) to add to our recipes.  Plus there were fractions flying all of the place!

I think we will have to observe this day again next year!